Bloglovin

Showing posts with label Bride. Show all posts

Monday, 9 March 2015

Wedding Update: 12 Weeks To Go!

Oh my god, where has the time gone?! I feel like it was only yesterday when I was sending out my Save the Dates and we had aaages to plan everything! Now, there's only 12 weeks left and I feel like there is still so much to sort!

A quick rundown of things that I have managed to tick off my checklist so far are:

Dress, shoes, suits, bridal gifts, chair covers, DJ, photographer, reception venue, church, table centres and transport and the total for all these is around £2300.

There's still rings, hair accessories, cufflinks, church and reception decorations, place cards and table plan among other things that I can't think of off the top of my head.

There are some obvious things that aren't on either list like cake and food and that's because we have booked them but don't have final costs yet. The food is definitely the most expensive item and the suits have actually come to more than my dress!!

I have finished pearling my shoes and I will get a post up about how to do it yourself very soon! I recorded me pearling a section of one of the shoes as it's hard to show what to do with pictures but I'm not sure if I'm confident enough to actually put it up! We'll see!!

Monday, 19 January 2015

DIY Message in an Egg


I got the idea for this from Lindy Tsang, better known as BubzBeauty when she told Tim she was pregnant. I thought it was such a good idea and that it would be a brilliant way for me to ask my cousins to be my bridesmaids!

photo

You will need:

Eggs

Paints

Paper

Pen

A small sharp object (A drawing pin or something similar would be best)

Bowl

Scissors

Ribbon (Optional)

Method:

1. Take your eggs and your sharp object (in my case I used a sewing stitch picker) and VERY carefully poke a small hole in both ends of the eggs. At this point, I didn’t actually think this would work so didn’t take any pictures!

2. Get your bowl and blow into one of the holes so that the insides of the egg come out of the other hole and into the bowl. This takes a little bit of time to build up the right technique and for all of the yolk to come out. After I had done it, I ran my eggs under the tap to get some water inside them and then blew it out again to make sure they were clean inside.

3. You will need to leave your eggs in a warm room for a few hours (preferably overnight) to make sure that the insides have completely dried out.

4. You can now paint your eggs in whatever pattern and colours you want Smile


photo 1 photo 2

5. Get your paper and cut it into a small thin strip. Write on whatever message you want, I went with “Will you be my bridesmaid <3” and role it up as small as you can get it and poke it through one of the holes. You can tie some ribbon around the eggs if you want to pretty it up a little bit more. In the picture below I left the notes half poking out of the hole so that you could see them. You will want to push these all the way in before you give them to the recipient.


photo 3

6. All that’s left to do now is to give them to whoever you have made them for! I only have 3 eggs because I asked my Maid of Honour whilst I was visiting her in Bournemouth and she is the oldest so didn’t really think she needed one! I visited all 3 of my cousins to give them their eggs and watched as they cracked them open to read their message. They all absolutely loved it!


photo 4


Would you use this method to ask your bridesmaids? Please let me know if you try it out!

Monday, 12 January 2015

DIY Wedding Invitations


How much do you think it cost me to make 70 invitations? Go on, guess!

Whatever you guessed, you’re probably way too high! It cost me £4 to make my invitations!
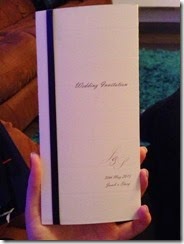
blogger-image-2079962182

I am very lucky as my Mom got the card/paper and envelopes for free from where she works and my friend designed the layout that I wanted into a PDF file for us to print. The only thing we had to buy was ribbon.

Now I know that a lot of you won’t have the luxury of being able to get free things from work but you’ll still be able to save a lot of money by doing your invitations yourself. I’m so happy with how professional mine came out. You would never guess they were handmade!

If you want to give these a go yourself then keep reading.

Things you’ll need:

Card

Matching Paper

Envelopes

Ribbon

Printer

Scoring Board (Optional)

Sticky Tape

Double Sided Sticky Tape

Craft Guillotine (Optional)

Scissors


Method:

1. The first thing you’ll need to do is to design the layout of your invitation. Mine was all one sided so could have easily been done in Microsoft Word. Once you’re happy with the layout and have printed a test piece to make sure it’s right, go ahead and print all the outers for the invites. Mine simply had “Wedding Invitation” our initials, names and date of the wedding.
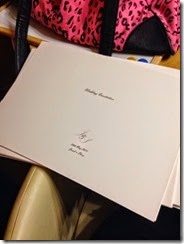
blogger-image-545735421


2. Once you’ve got them printed, you can either use a scoring board to make the folding a little bit easier and to make sure that you are folding them in the exact same place every time or you can just go ahead and fold them if you don’t have access to a scoring board.

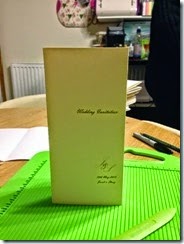
blogger-image-1091007256 blogger-image--1870254868

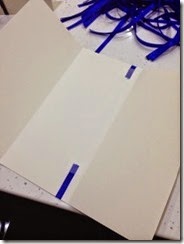
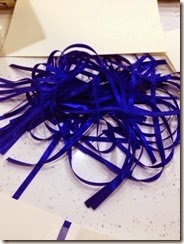
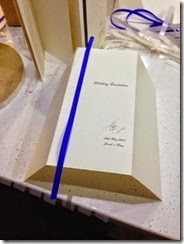
3. Now you have them folded you need to cut the ribbon into strips. Once these have been cut, you need to position them where you want them and then stick them down using normal sticky tape.
blogger-image--644108915blogger-image-1504597404blogger-image-888774399

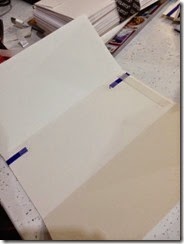
4. Using the double sided stick tape you now need to fold over the left hand third (as looking at it from the middle picture above) to cover the ribbon and to make it into a card. I used the double sided sticky tape on the top, bottom and down the side in order to make sure that it was securely stuck down.
blogger-image-1106574174blogger-image--2129901999

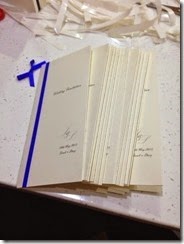
5. As you can see from the above picture, we toyed with the idea of having a bow on the front but we preferred the simplicity of the invite without it. You now need to print out the inners of the invites. I wanted every persons name to be typed out rather than putting a space for each name to be hand written but if you would prefer to hand write the names inside then that’s fine. I did this is Microsoft Word and had to print out a couple of test sheets to make sure I got the alignment right. Don’t forget to do two different inners – one for the day guests and one for the evening guests. Unfortunately, I forgot to get a picture of them before I stuck them in!

6. If you have a craft guillotine then you can use this to cut your inners to size and to make sure that you have straight lines. My cutting skills are really not that great so I used the guillotine option. If you don’t have a guillotine, then you can use a pair of scissors.

7. Finally, you just need to stick the inners into the outers using a strip of double sided sticky tape and then that’s the invitations done!

I haven’t posted a picture of the inners for privacy reasons but the wording we used is as follows:

Together with their families

Jacob John Warrilow & Stacy Bates

would like to invite

………………………….

to celebrate their marriage

at

………………………

reception to follow at

……………………..

Please RSVP by April 30th 2015


If anybody gives these a go, please let me know, I would LOVE to see!

Monday, 6 October 2014

The National Wedding Show


Warning: Picture Heavy Post
So this weekend me and mother bear went to the National Wedding Show!!!


It was very exciting and there was so much going on I didn't know where to look most of the time and ended up going down a few aisles twice because I'd missed some stands!

We actually ended up buying something from pretty much the first stand we went to. It was a teeth whitening stand and the lady was giving out "samples" to try. It was £40 and apparently has 120 treatments in the bottle and the whiteness lasts approximately 2 years. She said if you put the bottle in the fridge it should last 4-5 years so we would be able to a "second" lot of treatments. I am currently trying this out and will do a review once I've finished :)

I spotted my dress on one of the stands but it must have been a second hand stand because there was makeup on the inside of the dress, stains on the underarms and a pull across the middle of the netting. I know you can't do anything about the netting but you would have at least thought they would have got the dresses dry cleaned!!
 
We actually went there to find ideas for bridesmaid dresses and I was really disappointed with the lack of...well..anything!! There were probably 10 bridesmaid dresses in amongst the thousands of wedding dresses! Do they think we are all bridezillas and only think of ourselves?!

We watched a presentation on body shapes (I came to the conclusion I was a triangle SLASH hourglass. Yes, the woman emphasised the word slash as well :') Straight after that there was a fashion show/catwalk and we decided we would stay for some of it and ending up watching the whole thing! They had different themes such as Winter Wonderland, Blushing Brides, Purity, Country Roads, Highland Hills, Rustic Scenes etc..(disclaimer, those might not be the exact names lol I can't remember what they were!)

Here are a few snaps of the dresses in the show.


Which one was your favourite? :)